| View previous topic :: View next topic |
| Author |
Message |
Bud Brewster
Galactic Fleet Admiral (site admin)

Joined: 14 Dec 2013
Posts: 17160
Location: North Carolina
|
 Posted: Tue Jun 02, 2020 2:51 pm Post subject: Posted: Tue Jun 02, 2020 2:51 pm Post subject: |
 |
|
________________________________
Watching you exercise your creative talents during this time of hate and destruction is a true tonic for the creative and imaginative members of this board — along with the 100+ guests we often have each day! 
Thanks, Steve! The world has never needed what you're offering more than it does during these troubled times. 
_________________
____________
Is there no man on Earth who has the wisdom and innocence of a child?
~ The Space Children (1958) |
|
| Back to top |
|
 |
trekriffic
Starship Navigator

Joined: 19 Feb 2015
Posts: 593
|
| Posted: Mon Jun 08, 2020 12:20 pm Post subject: |
|
|
Took a break from drilling out windows on the E to see if I could cast the phaser strips for the nacelle pylons using Silly Putty and Envirotex jewelry resin.
I found two phaser strips on the aft end of the upper saucer that were the right length for making copies of.
Breaking off a small chunk of Silly Putty I pressed it down over the strip on the model and carefully peeled it away.
It made a perfect negative in the putty.
I made a total of eight molds even though I would only need two strips for each pylon; I figured I could then pick the best four to use in case some didn’t turn out as well:

USS Enterprise E - Nemesis-WIP- Casting Phaser Strips by Steve J, on Flickr
The resin dried overnight and I was able to peel it off the Silly Putty with no problems. I’d never tried this casting method before and am quite pleased with the results. Some flash to clean up first then I'll prime them:

USS Enterprise E - Nemesis-WIP- Nacelle Pylon Phaser Strip with Flash by Steve J, on Flickr
Each nacelle pylon has one phaser strip top and bottom along the trailing edge. Only the Nemesis E has them on the pylons.
This saved me a lot of time having to make them from scratch using styrene plastic. It would have been challenging to make them all exactly alike going that route so I’m extremely happy with how well the Envirotex casting method worked:

USS Enterprise E - Nemesis-WIP- Resin Cast Phaser Strip Test Fit by Steve J, on Flickr
So with this out of the way I’ll resume drilling windows. So far I’m about 3/4 done with the upper saucer. |
|
| Back to top |
|
|
Bud Brewster
Galactic Fleet Admiral (site admin)
Joined: 14 Dec 2013
Posts: 17160
Location: North Carolina
|
| Posted: Mon Jun 08, 2020 4:25 pm Post subject: |
|
|
________________________________
Not only do you do amazing work, Steve, I have never been able to keep my fingernails as well-trimmed as yours!
I'm intensely jealous. I wonder what my therapist will tell me this means . . . 
_________________
____________
Is there no man on Earth who has the wisdom and innocence of a child?
~ The Space Children (1958) |
|
| Back to top |
|
|
trekriffic
Starship Navigator
Joined: 19 Feb 2015
Posts: 593
|
| Posted: Mon Jun 08, 2020 7:35 pm Post subject: |
|
|
| Bud Brewster wrote: | Not only do you do amazing work, Steve, I have never been able to keep my fingernails as well-trimmed as yours!
I'm intensely jealous. I wonder what my therapist will tell me this means . . . |
Thanks for noticing Bud. I’m actually keeping my nails a little longer. Kobe, our male Tonkinese, likes them longer for a good scratch from me.

Kobe The Lap Cat by Steve J, on Flickr |
|
| Back to top |
|
|
trekriffic
Starship Navigator
Joined: 19 Feb 2015
Posts: 593
|
| Posted: Wed Jun 17, 2020 7:12 pm Post subject: |
|
|
I finally finished drilling out the upper saucer. Good grief there were a lot of windows:

USS Enterprise E - Nemesis-WIP- Upper Saucer Windows by Steve J, on Flickr
Moving on...
Making good progress on the lower saucer. A few more to go before moving on to the secondary hull halves:

USS Enterprise E - Nemesis-WIP- Lower Saucer Windows by Steve J, on Flickr
I think I’m getting the hang of window drilling at this point:

USS Enterprise E - Nemesis-WIP- Lower Saucer Window Light Test by Steve J, on Flickr
I use a pinvise and a micro drill bit (70, 71, or 72 works well) to drill thru the plastic.
Thankfully the kit has the window ports molded into the hull or it would be a nightmare to get the openings all straight and uniform in shape.
A pointed round file is used for final shaping and debris cleanup.
Any windows that don’t quite come up to snuff after shaping are filled in using my syringe and Perfect Plastic Putty, a water-based white filler putty.
They will become dark windows at some point:

USS Enterprise E - Nemesis-WIP- Window Drilling Tools by Steve J, on Flickr
The saucer shuttle bay control room window piece was glued to the saucer using Testors model cement.
I’m thinking now of lighting the windows with a small LED now. The LED would also light a pair of fiber optic strands for external floods underneath and to either side of the control room in front of the shuttle bay doors:
USS Enterprise E - Nemesis-WIP- Shuttle Bay Control Room Glued by Steve J, on Flickr
The brass PE doors were primed and glued to the clear kit part after sanding smooth.
Something I also discovered - two tiny holes in the photo-etch piece for feeding .030” fiber optic strands from inside the model for the floodlights that illuminate the doors underneath the control room windows as seen in Nemesis.
Just shows that Paul at Paragrafix thinks of everything:

USS Enterprise E - Nemesis-WIP- Shuttle Bay Rollup Doors by Steve J, on Flickr
Next up...
Drilling secondary hull windows and fiber optics. |
|
| Back to top |
|
|
trekriffic
Starship Navigator
Joined: 19 Feb 2015
Posts: 593
|
| Posted: Fri Jun 19, 2020 10:26 am Post subject: |
|
|
Added a short video on how I drill out the windows...

Window Drilling 101 by Steve J, on Flickr |
|
| Back to top |
|
|
Bud Brewster
Galactic Fleet Admiral (site admin)
Joined: 14 Dec 2013
Posts: 17160
Location: North Carolina
|
| Posted: Fri Jun 19, 2020 11:04 am Post subject: |
|
|
________________________________
Great job on the video!
I think you were a surgeon in a previous life. (Or a parallel universe).
_________________
____________
Is there no man on Earth who has the wisdom and innocence of a child?
~ The Space Children (1958) |
|
| Back to top |
|
|
trekriffic
Starship Navigator
Joined: 19 Feb 2015
Posts: 593
|
| Posted: Fri Jun 19, 2020 2:35 pm Post subject: |
|
|
| Bud Brewster wrote: | | I think you were a surgeon in a previous life. (Or a parallel universe). |
Funny you should say that, my wife has said the same thing from time to time. I do have very steady hands. |
|
| Back to top |
|
|
Bud Brewster
Galactic Fleet Admiral (site admin)
Joined: 14 Dec 2013
Posts: 17160
Location: North Carolina
|
| Posted: Fri Jun 19, 2020 4:54 pm Post subject: |
|
|
________________________________
I'm not a real doctor, nor have I played one on TV . . . but I did play doctor with a lovely young girl down the street when I was about nine. 
_________________
____________
Is there no man on Earth who has the wisdom and innocence of a child?
~ The Space Children (1958)
Last edited by Bud Brewster on Sat Jun 20, 2020 10:47 am; edited 1 time in total |
|
| Back to top |
|
|
trekriffic
Starship Navigator
Joined: 19 Feb 2015
Posts: 593
|
| Posted: Fri Jun 19, 2020 5:49 pm Post subject: |
|
|
| Bud Brewster wrote: | | I'm not a real doctor, nor have I played one on TV . . . but I did play doctor with a lovely young girl down the street when I was about nine. |
Oh my...  |
|
| Back to top |
|
|
trekriffic
Starship Navigator
Joined: 19 Feb 2015
Posts: 593
|
|
| Back to top |
|
|
Gord Green
Galactic Ambassador

Joined: 06 Oct 2014
Posts: 2948
Location: Buffalo, NY
|
| Posted: Fri Jun 26, 2020 9:55 pm Post subject: |
|
|
Most people would be amazed at how intricite the construction of a model can be.
Beautiful work!
_________________
There comes a time, thief, when gold loses its lustre, and the gems cease to sparkle, and the throne room becomes a prison; and all that is left is a father's love for his child. |
|
| Back to top |
|
|
trekriffic
Starship Navigator
Joined: 19 Feb 2015
Posts: 593
|
| Posted: Sat Jun 27, 2020 7:48 am Post subject: |
|
|
| Gord Green wrote: | Most people would be amazed at how intricite the construction of a model can be.
Beautiful work! |
Thanks Gord. My 94 year old MIL gets a kick out of it when I tell her what’s involved for these builds. She always says she wishes she had crafty skills but claims she never did. Still... she did create two great kids so that’s something to be proud of I think. |
|
| Back to top |
|
|
Bud Brewster
Galactic Fleet Admiral (site admin)
Joined: 14 Dec 2013
Posts: 17160
Location: North Carolina
|
| Posted: Sat Jun 27, 2020 9:41 am Post subject: |
|
|
| trekriffic wrote: | | Thanks Gord. My 94 year old MIL gets a kick out of it when I tell her what’s involved for these builds. She always says she wishes she had crafty skills but claims she never did. Still... she did create two great kids so that’s something to be proud of I think. |
Absolutely!
And they were both "scratch builds" which each took nine months, working 24/7!
Plus, she did all the work without ever seeing the results until they were completely finished! How cool is that?
_________________
____________
Is there no man on Earth who has the wisdom and innocence of a child?
~ The Space Children (1958) |
|
| Back to top |
|
|
trekriffic
Starship Navigator
Joined: 19 Feb 2015
Posts: 593
|
| Posted: Sun Jun 28, 2020 11:13 am Post subject: |
|
|
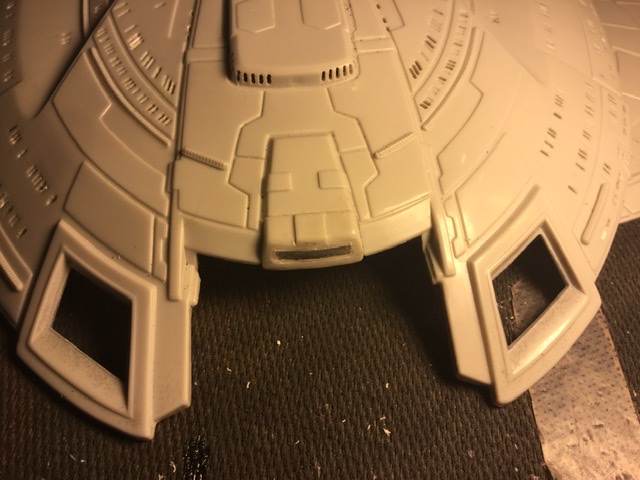
So yesterday I got ambitious and decided to tackle two things at once - the three docking ports on the aft end of the lowest of the three “bridge” decks and the aft facing dual torpedo launcher located atop the aft end of the same deck...
Using the decal sheet I took some measurements to help determine the length I needed to make the torpedo launcher. It’s going to be smaller than I imagined in my mind which is often the case:

USS Enterprise E - Nemesis-WIP- Decal Measurements by Steve J, on Flickr
Drawing from the few images available online I made a few sketches. This launcher is unique to the Nemesis version of the ship and the kit does not include it so I’ll use styrene rectangular rod and U-channel to make the main body and the two tiny photorp tubes respectively:

USS Enterprise E - Nemesis-WIP- Aft Saucer Dual Photorp Launcher Sketches and Sizing by Steve J, on Flickr
Changing gears after spending over an hour just figuring out the right width of the launcher (yeah, I’m anal that way) I turned my attention to the docking ports. The kit has three barely visible round indents indicating where the ports are located on the hull. Unfortunately, the kit is designed so the hatches would sit flush not extending out from the hull on three short access tubes. So...
I ended up finding a 5/64” diameter wood dowel that fit the photo-etch hatches perfectly. The wood dowel will fit the height of the sides and rear of the lowest bridge deck better than the styrene tubing I had planned to use. The PE hatches will be glued to the wood dowel pieces using 5 minute epoxy:

USS Enterprise E - Nemesis-WIP- Photo Etch Docking Port Hatches by Steve J, on Flickr
Because the sides of the bridge deck are slightly slanted and the docking ports need to be vertical I decided to drill holes and insert a short length of the wood dowel into each hole:

USS Enterprise E - Nemesis-WIP- Hole Drilling for Wood Dowels by Steve J, on Flickr
After inserting the dowels into the holes I dolloped some epoxy on the inside to glue them in place. Some divots left by the drill bit were filled with Perfect Plastic Putty:

USS Enterprise E - Nemesis-WIP- Wood Dowels by Steve J, on Flickr
After a little puttying and sanding I painted the dowels with Mister Surfacer 1000:

USS Enterprise E - Nemesis-WIP- Docking Ports Primed by Steve J, on Flickr
Having sorted the docking port tubes I went back to the photorp launcher which, after another hour or so of eye straining work, I brushed with Mister Surfacer and dry fitted above what I abbreviatedly refer to as “the lowest bridge superstructure aft observation deck“. Catchy isn’t it? I feel satisfied that the launcher’s shape and dimensions are very close to what Is shown in the CGI images. Some cleanup will be needed before I spray prime it and apply the finishIng coats to the hull:

USS Enterprise E - Nemesis-WIP- Test Fit Aft Saucer Photorp Launcher by Steve J, on Flickr
You wouldn’t think this all took about 3 hours would you? It did of course. As I’ve grown older I tend to spend a lot more time measuring and test fitting than I did in my more impatient youth; usually, I don’t mind saying, with much better results.
Thanks for reading. Think I’ll spend some time on the saucer shuttle bay window frames and doors next. Have to bend some fiber... |
|
| Back to top |
|
|
|


