 |
ALL SCI-FI
The place to “find your people”.
|
| View previous topic :: View next topic |
| Author |
Message |
trekriffic
Starship Navigator

Joined: 19 Feb 2015
Posts: 593
|
 Posted: Sat Oct 24, 2020 2:03 pm Post subject: Posted: Sat Oct 24, 2020 2:03 pm Post subject: |
 |
|
Components for powering the display base for lighting:

USS Enterprise E - Nemesis-WIP- Base Wiring Up by Steve J, on Flickr
After drilling a hole thru the wooden base, wires from the aluminum display tube are fed into a slot routed out in the underside of the base for soldering to the power jack:

USS Enterprise E - Nemesis-WIP- Display Base by Steve J, on Flickr
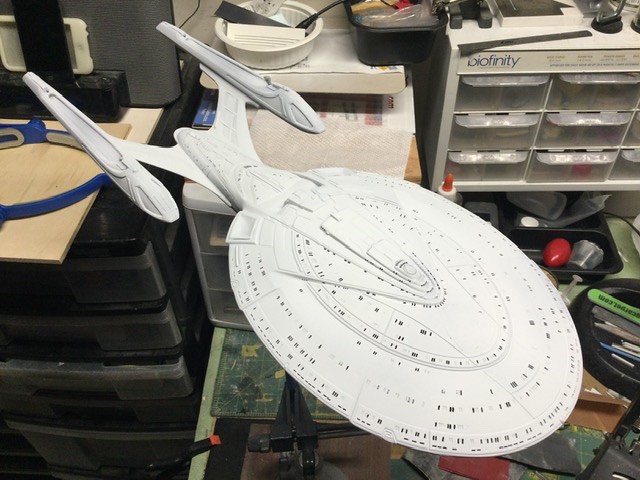
12V DC power is plugged in and the ship lights up as it should. She’s fully masked. One more going over with the alcohol wipe and she gets primed:

USS Enterprise E - Nemesis-WIP- Light Check with Base by Steve J, on Flickr
Before final alcohol cleanup I have her a close inspection with the magnifier headset. I was glad I did as I found a few small spots that needed carving or more cleanup, mostly dried putty in the margins. Stuff a digItal camera would notice:

USS Enterprise E - Nemesis-WIP- Pointing Her Up by Steve J, on Flickr
Got these at Michaels craft store years ago and forgot about them. Found them and they worked great! I could not have done some of the smaller parts and detail work without them:

USS Enterprise E - Nemesis-WIP- Magnifying Headset by Steve J, on Flickr
Parts with detail I don’t want getting buried under the primer coat are brushed with liquid mask.
Looking at all the crap still on the surface before final cleanup... it’s truly amazing how many sins a good coat of primer will cover up:

USS Enterprise E - Nemesis-WIP- Liquid Masking by Steve J, on Flickr
I don’t want the primer coat to cover up all the detailing on the stern spine Photorp launcher so I gave it a coat of liquid mask. It will probably be brushed with the final color at the end just before decaling begins:

USS Enterprise E - Nemesis-WIP- Liquid Masking by Steve J, on Flickr
Next... reworking the aft ends of the nacelles. |
|
| Back to top |
|
 |
Bud Brewster
Galactic Fleet Admiral (site admin)

Joined: 14 Dec 2013
Posts: 17160
Location: North Carolina
|
| Posted: Sat Oct 31, 2020 4:38 pm Post subject: |
|
|
________________________________
If you ever wonder why you don't get many replies to posts on the model threads like this one, it's for the same reason that people are always quiet and attentive during a fascinating lecture being delivered by a wonderful artist! 
As you mentioned to me on the phone recently, this thread alone has 11,632 "views". I think that speaks volumes, Steve! 
_________________
____________
Is there no man on Earth who has the wisdom and innocence of a child?
~ The Space Children (1958) |
|
| Back to top |
|
|
trekriffic
Starship Navigator
Joined: 19 Feb 2015
Posts: 593
|
|
| Back to top |
|
|
Bud Brewster
Galactic Fleet Admiral (site admin)
Joined: 14 Dec 2013
Posts: 17160
Location: North Carolina
|
| Posted: Mon Nov 02, 2020 6:42 pm Post subject: |
|
|
________________________________
Steve, while reading your well-written description of the careful enhancements you're making, I had a mental image of Michelangelo looking over your shoulder and listening carefully to your description of how you were creating your masterpiece.
As Michelangelo nodded sagely, he said, "Good, good . . . your attention to detail is admirable, Stefano! Now I think I'll go back and take a look at the Sistine Chapel one more time to be sure I haven't overlooked anything."

_________________
____________
Is there no man on Earth who has the wisdom and innocence of a child?
~ The Space Children (1958)
Last edited by Bud Brewster on Tue Dec 15, 2020 9:46 am; edited 1 time in total |
|
| Back to top |
|
|
trekriffic
Starship Navigator
Joined: 19 Feb 2015
Posts: 593
|
|
| Back to top |
|
|
Bud Brewster
Galactic Fleet Admiral (site admin)
Joined: 14 Dec 2013
Posts: 17160
Location: North Carolina
|
| Posted: Tue Dec 15, 2020 9:51 am Post subject: |
|
|
________________________________
Now you've put me in the mood to watch a Star Trek double feature! Gee, I wonder what would go together well . . . 

_________________
____________
Is there no man on Earth who has the wisdom and innocence of a child?
~ The Space Children (1958) |
|
| Back to top |
|
|
trekriffic
Starship Navigator
Joined: 19 Feb 2015
Posts: 593
|
| Posted: Fri Jan 01, 2021 1:33 pm Post subject: |
|
|
Here are some more in-progress pics...
More of second basecoats...

USS Enterprise E - Nemesis-WIP- Second Basecoat by Steve J, on Flickr
More masking...
The secondary hull and warp,engines are slightly darker aft of the saucer separation arc. There is an even darker set of panels flanking the aft end of the strongback oval which has been masked off for painting:

USS Enterprise E - Nemesis-WIP- Panel Masking by Steve J, on Flickr
Test look with grill...
The medium dark grey I used for the trim on top of the nacelles looks almost the same color as the dark grey primer I used on the photo-etch grills. A good match:

USS Enterprise E - Nemesis-WIP-Nacelle Upper Grill Test Look by Steve J, on Flickr
Colors used on this build so far...
The large bottles are...
On the left, the secondary hull, nacelle pylons, nacelles, and ventral saucer light grey enamel;
and the slightly lighter upper saucer and nacelle accent, very light grey.
The small plastic containers (pots) are, from left to right...
Two pots of the upper nacelle trim (around the blue glowing grill) medium dark grey, the second pot is just thinned down.
The pot on the right is the color I used for the medium grey panels on the strongback.
There will be more shades to come I’m pretty sure.

USS Enterprise E - Nemesis-WIP- Shades of Grey by Steve J, on Flickr
Accent colors...
I decided to brush paint the various greys using thinned enamels using Tamiya tape and a liner brush:

USS Enterprise E - Nemesis-WIP- Nacelle Accent Painting by Steve J, on Flickr
A darker grey variant of the secondary and nacelle hull color was used on these panels. I may lighten them a bit once I can see the contrast with the secondary hull lighter grey after de-masking:

USS Enterprise E - Nemesis-WIP- Strongback Accent Painting by Steve J, on Flickr
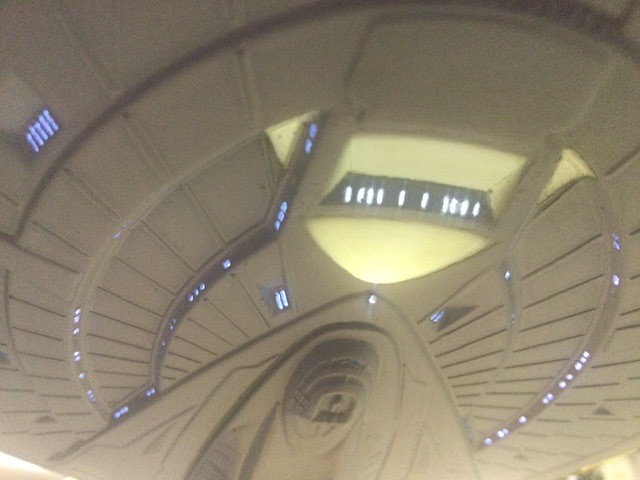
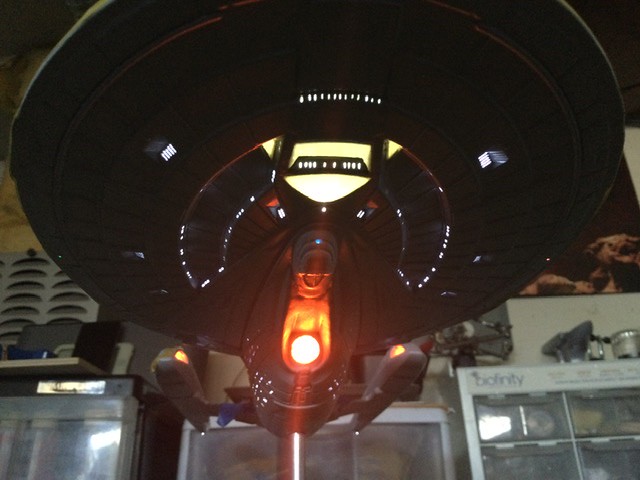
Light test after unmasking. I like how the fiber optic “porch” lights turned out:

USS Enterprise E - Nemesis-WIP- Saucer Shuttlebay Unmasked by Steve J, on Flickr
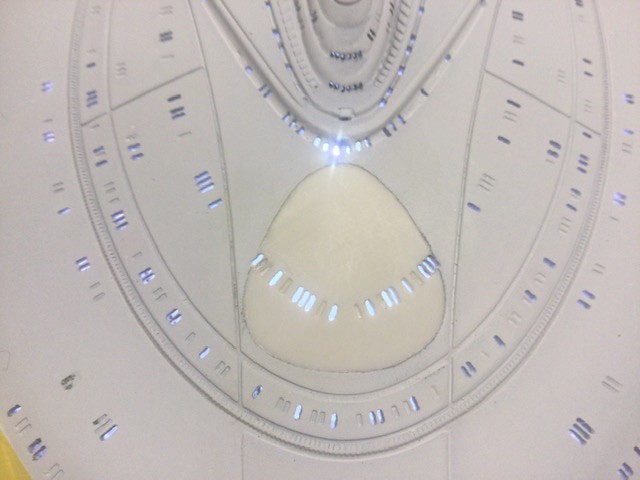
The lower saucer flood masking tape is removed and cleaned up:

USS Enterprise E - Nemesis-WIP- Lower Floodlight Unmasked by Steve J, on Flickr
A few spots to clean up in the corners but otherwise this turned out pretty well:
USS Enterprise E - Nemesis-WIP- Lower Flood after Unmasking by Steve J, on Flickr |
|
| Back to top |
|
|
trekriffic
Starship Navigator
Joined: 19 Feb 2015
Posts: 593
|
| Posted: Fri Jan 01, 2021 1:39 pm Post subject: |
|
|
The upper floodlight masking tape is removed and cleanup begun on the edges. It will be interesting to see how this looks once the aztec decals are on:

USS Enterprise E - Nemesis-WIP- Unmasking by Steve J, on Flickr
Did a little sanding around the edges to eliminate any paint ridges. An aztec decal will cover the whole area including the floodlight:
USS Enterprise E - Nemesis-WIP- Unmasking and Cleanup by Steve J, on Flickr
Video!
The model is partially unmasked. Still have to unmask three bussards, the tops of the nacelles, impulse engines, the deflector dish, and some of the running lights. The floodlights on he saucer will be mostly covered by aztec decals.The aztec wallpaper decals mean I could have been sloppier with the paint but I can’t work that way so... I have spent hours pointing up and fixing very small imperfections; mostly cleaning up small bits of putty that must have stuck to my fingers then stuck to the model unnoticed until later or reshaping some of the window ports.
Seems like overkill maybe but the camera will show up any mistakes; mistakes which could spoil the illusion of a real starship that you are trying to create:

USS Enterprise E - Nemesis-WIP- In the Dark Video by Steve J, on Flickr
Stand by for more exciting transmissions! |
|
| Back to top |
|
|
Bud Brewster
Galactic Fleet Admiral (site admin)
Joined: 14 Dec 2013
Posts: 17160
Location: North Carolina
|
| Posted: Fri Jan 01, 2021 2:06 pm Post subject: |
|
|
________________________________
I'm sure the folks in the other forums which are devoted to model building are enjoying the progress reports you're posting as much as we are! 
_________________
____________
Is there no man on Earth who has the wisdom and innocence of a child?
~ The Space Children (1958) |
|
| Back to top |
|
|
trekriffic
Starship Navigator
Joined: 19 Feb 2015
Posts: 593
|
|
| Back to top |
|
|
Bud Brewster
Galactic Fleet Admiral (site admin)
Joined: 14 Dec 2013
Posts: 17160
Location: North Carolina
|
| Posted: Fri Jan 15, 2021 4:55 pm Post subject: |
|
|
| trekriffic wrote: | Stay tuned for the next episode...
Disaster Strikes!  |
Wait . . . what! 
You've definitely got our attention!
_________________
____________
Is there no man on Earth who has the wisdom and innocence of a child?
~ The Space Children (1958) |
|
| Back to top |
|
|
trekriffic
Starship Navigator
Joined: 19 Feb 2015
Posts: 593
|
| Posted: Tue Feb 09, 2021 7:30 pm Post subject: |
|
|
Disaster strikes!
Had one of the worst things in electrified modeling happen when I messed up and broke the DC power jack in the underside of the secondary hull loose from inside the model when I pressed down too hard on the coaxial DC plug.
There must have been a slight misalignment between the tubing rings that connected the jack to the mounting hole where the coaxial plug display tube plugged in. 😮
My heart sank.
I would now have to cut open the underside and re-attach the polypropylene (or whatever that black plastic is) jack to the inside of the hull plug hole.
Using a razor saw and scribing tool I cut out a rectangular opening around the jack socket in the underside of the model.
Thank god this happened before I applied the aztec panel decals!
There it was... the power jack... ripped from its moorings and pushed down into the wiring.
The ease with which the jack broke free confirmed that I needed to come up with a better, stronger mounting point for the model.
Luckily I left enough slack in the wires to be able to pry the jack up and out of the opening I had cut without having to remove it and re-solder the wires.
I suppose it was a good thing this happened when it did though. The joint was weak as it turned out and, I think, would have broken at some point down the road anyway.

USS Enterprise E - Nemesis-WIP- Power Jack Disaster and Rework by Steve J, on Flickr |
|
| Back to top |
|
|
trekriffic
Starship Navigator
Joined: 19 Feb 2015
Posts: 593
|
| Posted: Wed Feb 10, 2021 2:12 pm Post subject: |
|
|
Disaster and Recovery...
Spacer test fit for proper insertion depth using the DC power plug from the base and a spare DC power jack from my stash. A box will be constructed around the black plastic jack for the jack in the model to glue into:
USS Enterprise E - Nemesis-WIP- Power Jack Disaster and Rework by Steve J, on Flickr
Rather than just gluing the old jack back to the mounting hole like before, I decided to improve the entire power/mounting point assembly by building a box to fit around the sides of the jack.
Here is a spare jack I used to build the new super strong jack with L brackets that will be glued to the sides of the black power jack inside the model using Plastic Surgery glue and epoxy:

USS Enterprise E - Nemesis-WIP- Power Jack Disaster and Rework by Steve J, on Flickr
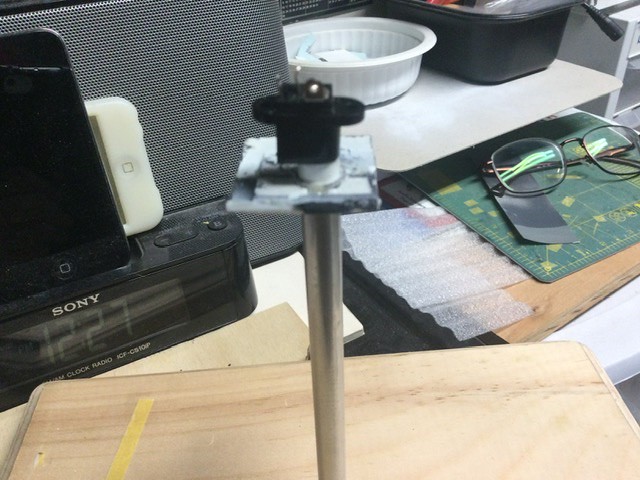
New DC power jack mount checked for levelness on base. I also held up the model behind it and it will sit nice and level when the hull piece is glued back into the underside of the model:

USS Enterprise E - Nemesis-WIP- Power Jack Disaster and Rework by Steve J, on Flickr
The mounting box is completed for the power jack using styrene sheet, tubing, and AVES Apoxy Sculpt. It will be glued up and plugged onto the power jack which is still soldered in place inside the model:

USS Enterprise E - Nemesis-WIP- Power Jack Disaster and Rework by Steve J, on Flickr
Muuuuch better mounting point after replacing the flimsy jack glue attachment method that broke under stress. Just a few light leaks to fill in around the hull piece I’d had to slice out to make the repair:

USS Enterprise E - Nemesis-WIP- Improved Mounting Point by Steve J, on Flickr
The new box and putty arrangement around the power jack in the underside of the model works well. Nice and level as I thought it would be:

USS Enterprise E - Nemesis-WIP- Improved Mounting Point by Steve J, on Flickr
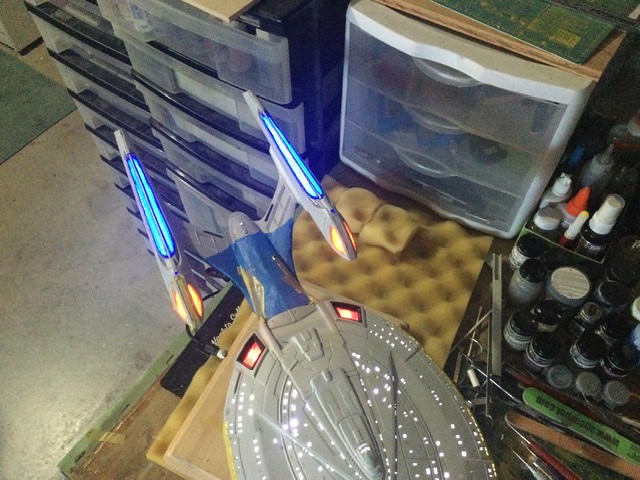
The new display mount is much sturdier. No wobble at all on the stand. Here are the unmasked impulse engines:

USS Enterprise E - Nemesis-WIP- Impulse Engines Unmasked by Steve J, on Flickr |
|
| Back to top |
|
|
Bud Brewster
Galactic Fleet Admiral (site admin)
Joined: 14 Dec 2013
Posts: 17160
Location: North Carolina
|
| Posted: Wed Feb 10, 2021 2:56 pm Post subject: |
|
|
________________________________
Good lord, Steve! Who'd have thought that a model-building project could suddenly become a dramatic nail biter!
You pointed out the fact that as bad as this mishap was, it would have been worse if you'd discovered the problem later on. So, that's the "glass half full" way of looking at the situation.
Just to add a bit more water to that half-full glass, your description of this problem — and it's solution — has provided this thread with an unexpected bit of drama, making it even more interesting to All Sci-Fi's members!
We certainly aren't hoping for more mishaps to occur . . . but if they happen, rest assured that we'll applaud your skills when you solve any new problems.
_________________
____________
Is there no man on Earth who has the wisdom and innocence of a child?
~ The Space Children (1958) |
|
| Back to top |
|
|
trekriffic
Starship Navigator
Joined: 19 Feb 2015
Posts: 593
|
| Posted: Wed Feb 17, 2021 2:49 pm Post subject: |
|
|
I filled in around the hull part I had to cut out to effect repair of the DC Power jack mounting point with putty.
The first putty was water based PPP mixed with black watercolor, pushed into the seams to eliminate a few light leaks from inside the model.
After this dried I filled the seams with AVES Apoxy sculpt to smoothness.
Next morning, I brushed the whole area with more hull color, about 3 coats did the trick.
It didn’t have to be perfect, since the entire thing is covered by an aztec decal.
But it still looks pretty good I think:
USS Enterprise E - Nemesis-WIP- Repair Complete by Steve J, on Flickr
After removing the Tamiya tape and cleaning up any primer flakes, I placed the PE grills on top and lit ‘em up!
Love the even glow I got using the diffuser materials:
USS Enterprise E - Nemesis-WIP- Upper Nacelle Blue Panels Unmasked by Steve J, on Flickr
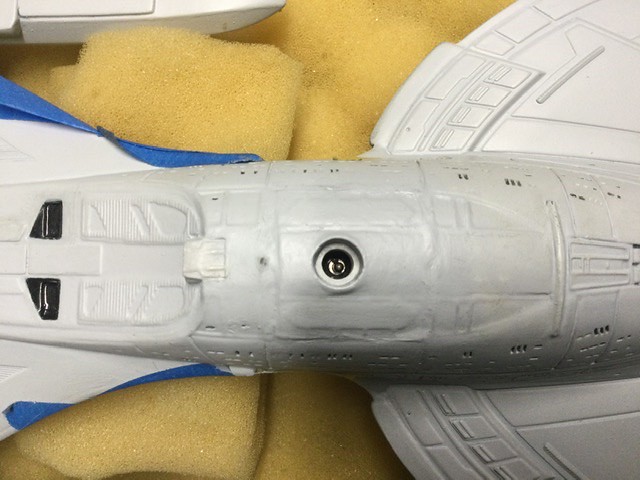
I removed the tiny piece of Tamiya tape masking the quantum torpedo port located just under the front of the Captain’s yacht.
There was some dried liquid mask as well.
After that, I touched up around the opening, using a fine tipped brush and some of the thinned lower hull color:

USS Enterprise E - Nemesis-WIP- Quantum Torpedo Cleanup by Steve J, on Flickr
The quantum torpedo port lit up with its blue LED:
USS Enterprise E - Nemesis-WIP- Quantum Torpedo Port Lit After Unmasking by Steve J, on Flickr
The blue LED is shining through a thin layer of hull color inside the quantum torpedo port.
I had planned to clean it up, but I may just leave it as is.
It serves to mute the brightness, which I think is better.
If you look even closer you can see shallow grooves I scribed inside the hole with a pointy scribing tool:

USS Enterprise E - Nemesis-WIP- Quantum Torpedo Port Lit - Closeup by Steve J, on Flickr
Tailoring the detail painting to match the decal sheet:
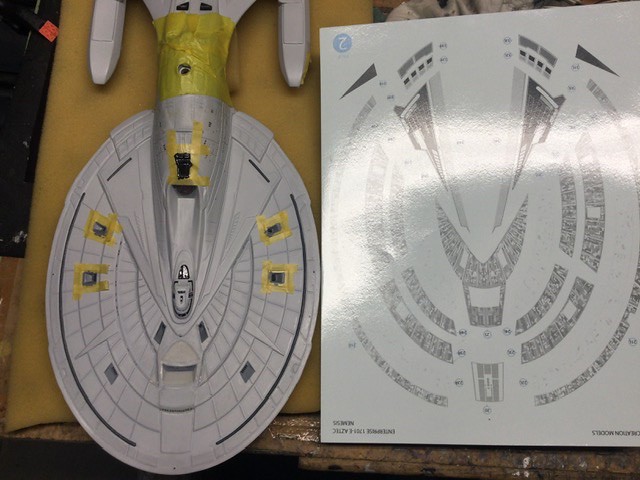
USS Enterprise E - Nemesis-WIP- Decal Sheet Comparison by Steve J, on Flickr
Masked and painted around recessed window ports and photorp launcher.
The captain’s yacht was painted with metallic black and a mix of light grey enamel and black decal film trimmed
to fit the yacht’s warp pylons:
USS Enterprise E - Nemesis-WIP- More Masking by Steve J, on Flickr
Still finishing up detail painting on the Cousteau captain’s yacht.
Removed masking after painting the forward secondary hull dual photon torpedo launcher and the window recesses:

USS Enterprise E - Nemesis-WIP- Unmasking by Steve J, on Flickr
New decals for the front of the nacelle and RCS thrusters. Courtesy of meatloafr over on All Scale Trek.
Meatloafr printed the decals in two sizes and provided plenty of spares.
He also printed several iterations of a Nemesis base decal:

USS Enterprise E - Nemesis-WIP- Meatloafr Decals by Steve J, on Flickr
After two days of hell I finished the yacht.
The gloss will be cut down to satin flatness after the final clear coat:
USS Enterprise E - Nemesis-WIP- Captain’s Yacht Gloss by Steve J, on Flickr |
|
| Back to top |
|
|
|
|
You cannot post new topics in this forum
You cannot reply to topics in this forum
You cannot edit your posts in this forum
You cannot delete your posts in this forum
You cannot vote in polls in this forum
|
Powered by phpBB © 2001, 2005 phpBB Group
|