| View previous topic :: View next topic |
| Author |
Message |
Brent Gair
Mission Specialist
Joined: 21 Nov 2014
Posts: 466
|
 Posted: Wed Nov 26, 2014 7:16 pm Post subject: Building the Lost in Space Robot Posted: Wed Nov 26, 2014 7:16 pm Post subject: Building the Lost in Space Robot |
 |
|
The robot from Lost in Space is certainly the most iconic robot in television history. It was first kitted by Aurora almost 50 years ago. Not surprisingly, the kit wasn't very accurate and, while it certainly looked like the robot, the shape of ALL the parts was just far enough OFF that it could never be built into an accurate miniature no matter how much reworking was done.
An expensive resin kit from Lunar models was available for awhile. The kit was fairly accurate and very expensive. But Lunar models is currently "inactive".
Moebius Models answered the prayers of Lost in Space fans with an EXTREMELY accurate kit of the Robot B9 which has just been released in the last year. This kit is head and shoulders above any toy, miniature or model which has previously been available. This fairly large kit can be built into the most accurate B9 display piece ever sold to the public .
However this kit is not without some significant drawbacks. It has some issues which make this a very difficult build for any modeler who doesn't have a lot experience. It looks pretty but it takes a lot of work.
My kit is not finished. I'll post in-progress picks as things go.
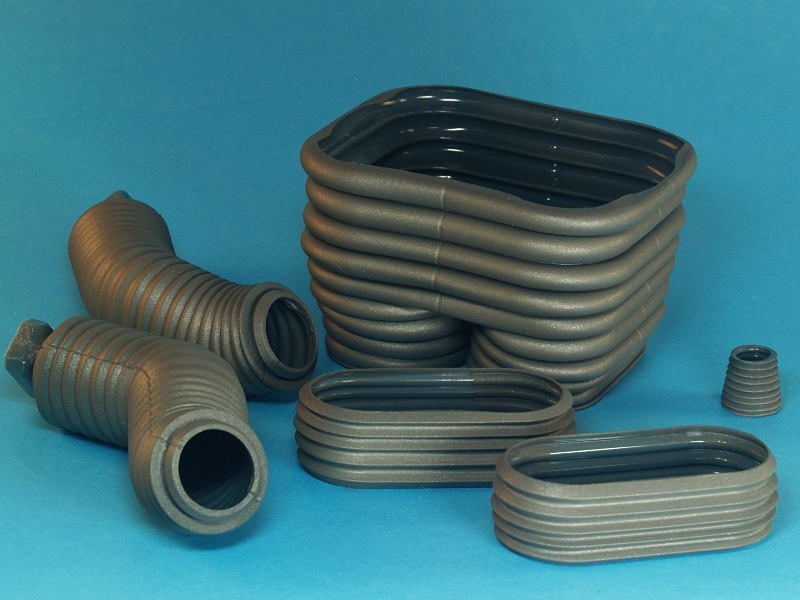
This first post will address two of the serious issues with this kit: blow molded vinyl parts and seams in the tread sections.
There was great consternation among modelers when Moebius disclosed that parts of the kit would be molded in vinyl. There was even greater consternation when it was discovered that these parts are not thick-walled heavy vinyl but are paper thin and very flexible. The SHAPE of these parts is incredibly accurate. But painting and handling is a son-of-a-gun. Most paints don't like to stick to this stuff and handling can easily cause it to crack. I gave the parts a base coat of automotive vinyl paint cut with some auto lacquers. The tone of the paint will be adjusted as the kit nears completion. I don't want to do a full finish paint at this time because I suspect any handling during construction will result in damage requiring later touch up anyway.
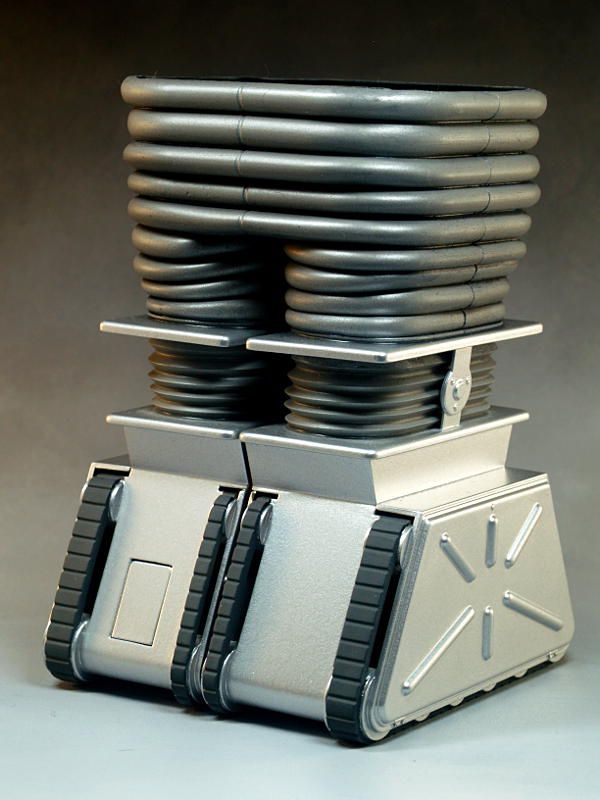
I began construction with the tread boxes. Like the rest of kit, these are wonderfully accurate in shape. However, they require a staggering amount of seam work. It looks as if the individual components were made in multipart molds which puts a lot of awkward mold lines on the parts. Furthermore, when assembled, there are very large seams at the glue joints. This is all exacerbated by the fact that these seams fall on flat surfaces. It's harder to hide seams on flat surfaces. My advice would be to regard the tread boxes as separate models and be prepared to spend a few days building them and filling the seams. Don't think that you can build the tread boxes and have them finished in 20 minutes.
The one modification I made was to add blind 1/4" 20 nuts inside the tread boxes so that I can bolt the robot to a base should I decide to do so.
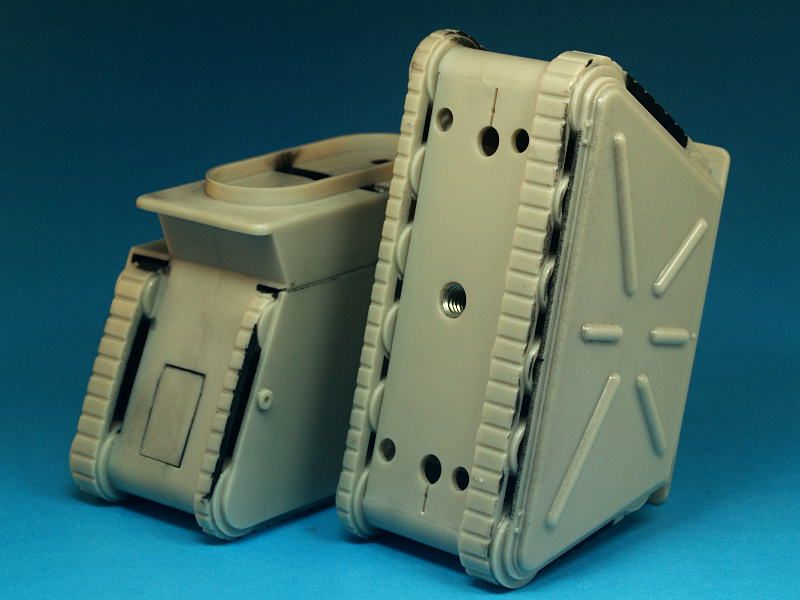
Here's the completed tread boxes with the lower leg sections set on top. It took a LOT of seam work to hide the prominent seams on these assemblies.
Here, we see the early stages of the much less troublesome torso assembly. Fortunately, this fits nicely and shouldn't challenge any modeler.
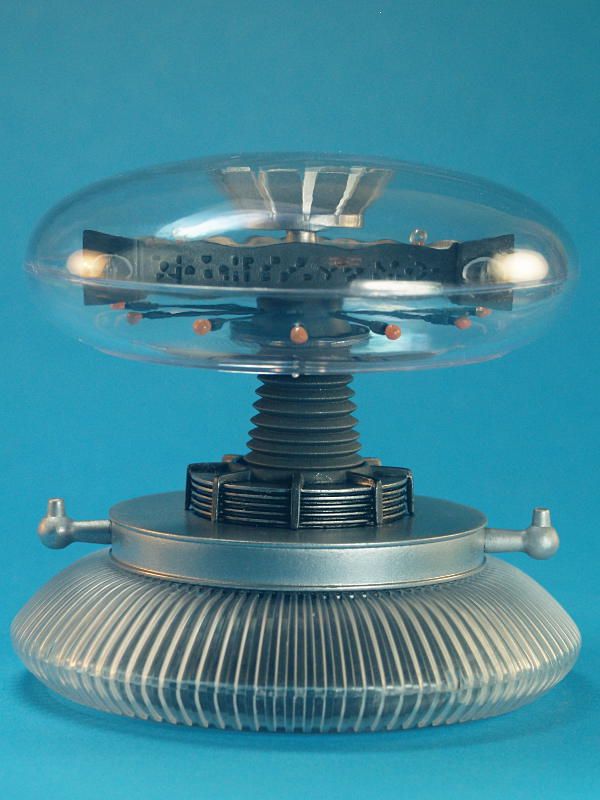
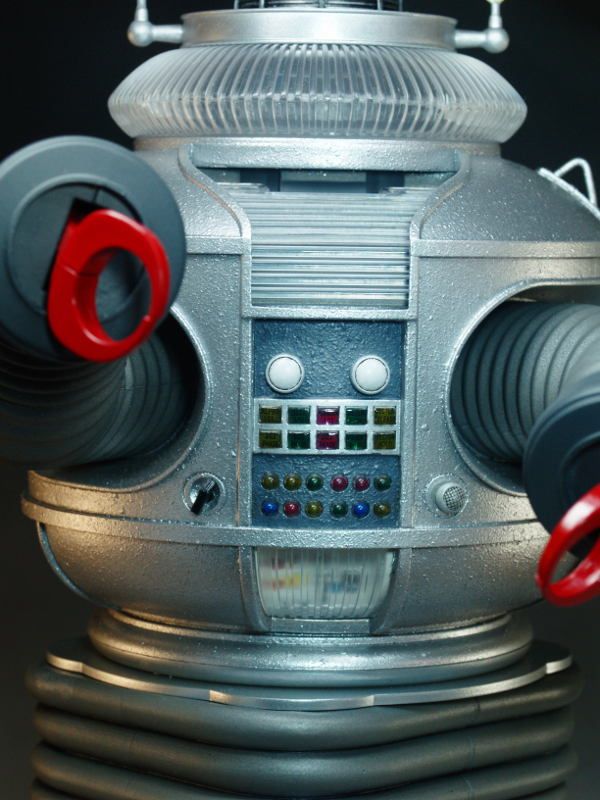
Here's the head, neck and collar of the robot nearing completion. Again, this is pretty straight forward with no special problems. Joining the clear head parts is always a bit of a nuisance but I use clear epoxy since it can be easily wiped off with rubbing alcohol if you smear it during construction. Using normal plastic model cement poses a risk because it will mar a clear surface.
 |
|
| Back to top |
|
 |
Bud Brewster
Galactic Fleet Admiral (site admin)

Joined: 14 Dec 2013
Posts: 17637
Location: North Carolina
|
| Posted: Wed Nov 26, 2014 10:06 pm Post subject: |
|
|
My stars and garters, these pictures are works of art all by their lonesome, sir. Pleasing background, perfect lighting, and crystal clear images. Please tell us what kind of camera you use. Just curious.
Your discussion of the process is spot-on, as usual. I had fun imagining you on the imaginary web cast I suggested, with the cameraman zooming in for closeups while you talked. 
We're all going to enjoy watching you build up this thread while you build the model.
Thanks, Brent.
 Emerald Duck Call Award Emerald Duck Call Award
* This one, by the way, makes nine!
_________________
____________
Is there no man on Earth who has the wisdom and innocence of a child?
~ The Space Children (1958) |
|
| Back to top |
|
|
Brent Gair
Mission Specialist
Joined: 21 Nov 2014
Posts: 466
|
| Posted: Wed Nov 26, 2014 11:56 pm Post subject: |
|
|
| Bud Brewster wrote: | ...Please tell us what kind of camera you use. Just curious.
|
The camera is an Olympus E500 DSLR. It's an older model from 2006; obsolete in the fast changing world of digital photography. However, it's excellent for this purpose.
I have a number of cameras in this "family". Since this old E500 is slower and has no image stabilization, it is perfect for use on a tripod. The lens is a very high quality 50mm f2 macro. Although I sometimes use that lens on other cameras, I generally keep it on the E500 because they are an ideal combination for close-up photography.
 |
|
| Back to top |
|
|
Brent Gair
Mission Specialist
Joined: 21 Nov 2014
Posts: 466
|
| Posted: Fri Nov 28, 2014 2:30 pm Post subject: |
|
|
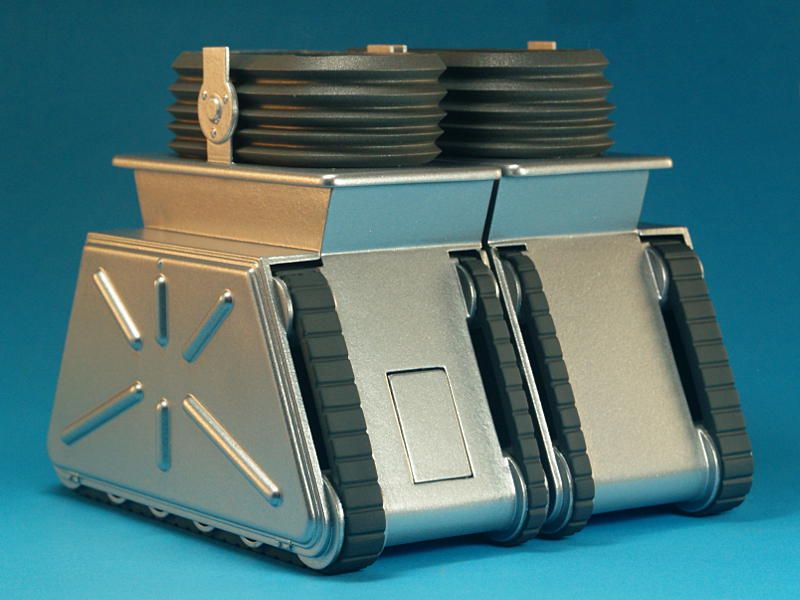
Assembling the legs to the tread boxes is the last truly problematic issue with this kit.
The distance between the tread boxes is set by locating pins and can't realistically be altered by the model builder. Though you could shave off the locating pins and change the distance, you would be left with the tread boxes at a non-scale distance apart...so you wouldn't be any further ahead for your efforts.
This is an issue because the lower opening of the main legs molding is also permanently set by the molding process and can't be changed. And the distance between the lower openings does not match the distance between the tread box and lower leg assembly.
So you have two mismatched assemblies which can't be changed...but must still be made to fit together.
Forcing the upper leg assembly onto the lower leg/tread boxes causes the top of the tread boxes to splay out and the bottom to splay in. In essence, the robot wil be bow-legged.
The only answer that I could come up with was some reinforcements that would squeeze everything into position by making the tread boxes immovable. I put some small plastic strips at the top of the tread boxes on the INNER portion of the boxes near parts called the "inner knees". This holds the tread boxes together at the top and makes it impossible for them to bow outwards. The upper legs, being slightly flexible will squeeze into position and won't be able to distort the lower legs and tread boxes.
 |
|
| Back to top |
|
|
Brent Gair
Mission Specialist
Joined: 21 Nov 2014
Posts: 466
|
| Posted: Sat Nov 29, 2014 3:56 pm Post subject: |
|
|
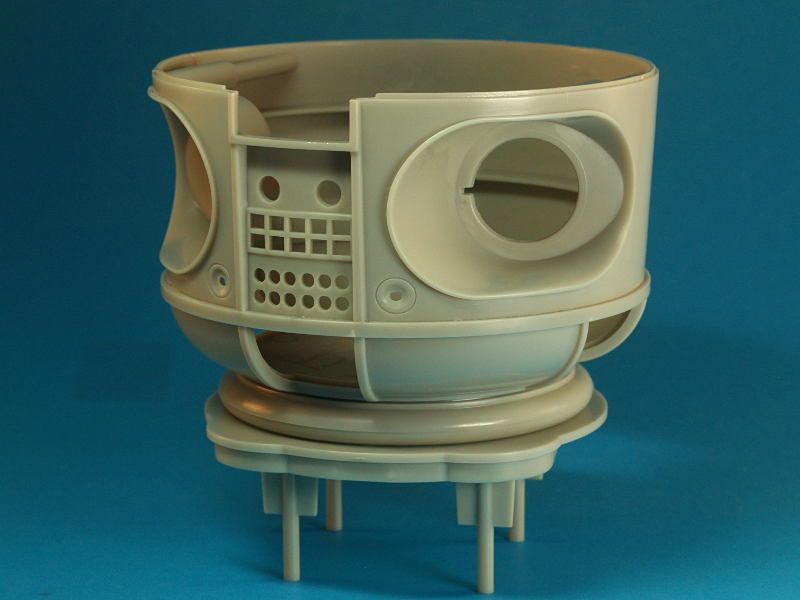
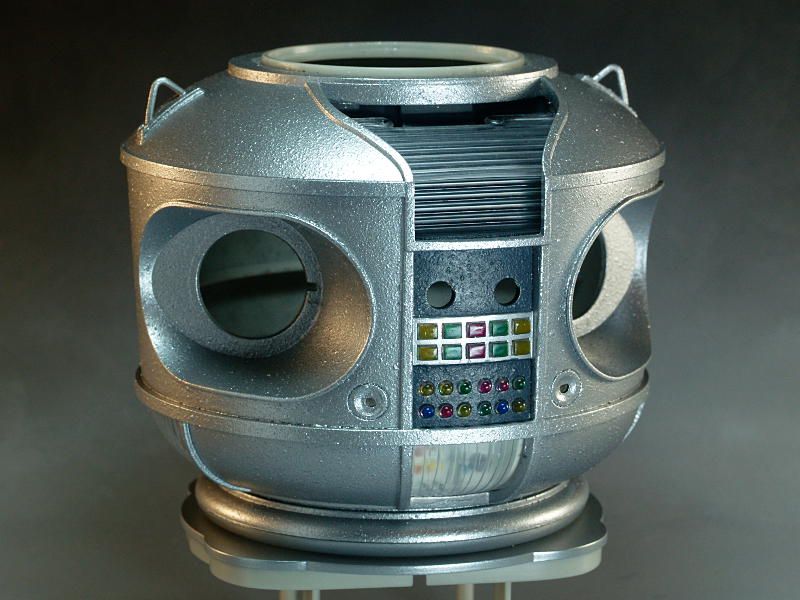
Things get a little simpler above the waist...the torso is pretty straightforward model building with no special challenges.
The one extra step that I took was to add the texture seen later in the series. This texture is specifically mentioned in the kit instructions for modelers who wish to include it in the finish. The kits I've seen completed so far don't include the texture. I suspect that most model builders don't have a good idea about how to do it. I used a texture paint from a spray can and LIGHTLY MISTED the torso surface from a distance. You don't want to apply this paint "normally" or you'll end up with a heavy crinkle finish. After applying the light mist of texture paint, I put on a coat of silver lacquer.
 |
|
| Back to top |
|
|
Bud Brewster
Galactic Fleet Admiral (site admin)
Joined: 14 Dec 2013
Posts: 17637
Location: North Carolina
|
| Posted: Sat Nov 29, 2014 5:42 pm Post subject: |
|
|
There's just one word for this, Brent.
Wow.
It's a Latin word, first used by Caesar when he met Cleopatra. The Queen of the Nile had a legendary torso, but I think you've put her in second place with the one shown above -- hence my choice of Latin expletives.
Or to put it another way --
E Pluribus Benignum.
"Out of many parts, one great robot!"
(And yes, benignum is Latin for benign! )
Emerald Duck Call Award
* Three great posts deserve three EDCA's, so this one counts triple. 
_________________
____________
Is there no man on Earth who has the wisdom and innocence of a child?
~ The Space Children (1958) |
|
| Back to top |
|
|
orzel-w
Galactic Ambassador

Joined: 19 Sep 2014
Posts: 1865
|
| Posted: Sat Nov 29, 2014 7:23 pm Post subject: |
|
|
Although I have no particular affection for the LIS robot, I still enjoy reading model construction journals. Lots of creativity involved where one might not expect to find it... building a kit.
_________________
...or not...
WayneO
----------- |
|
| Back to top |
|
|
Brent Gair
Mission Specialist
Joined: 21 Nov 2014
Posts: 466
|
| Posted: Sat Nov 29, 2014 7:25 pm Post subject: |
|
|
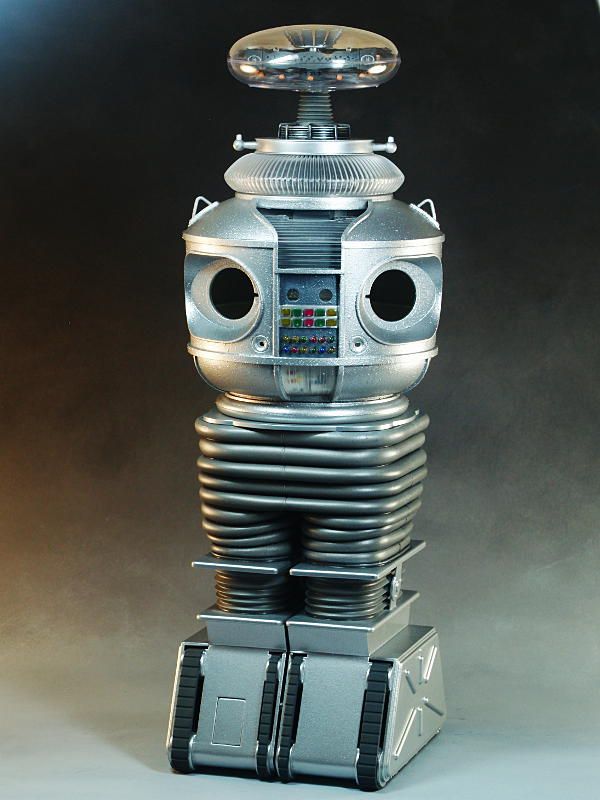
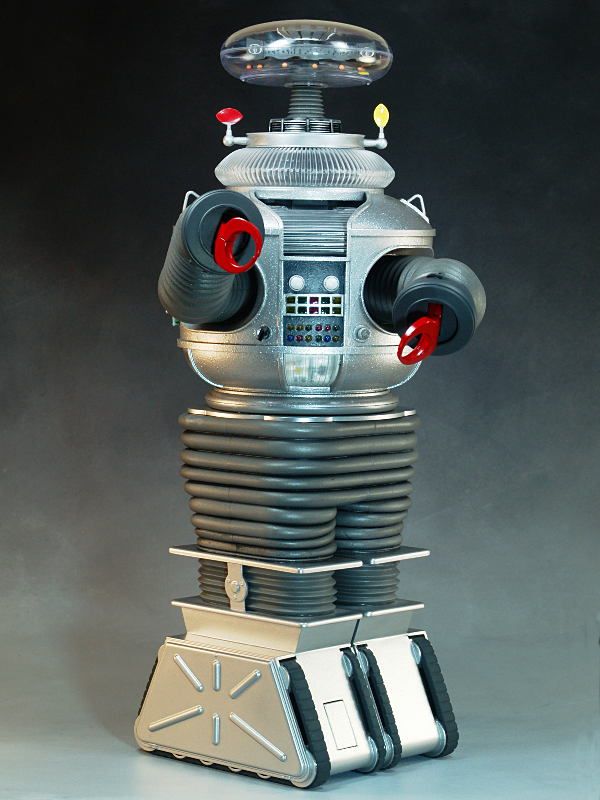
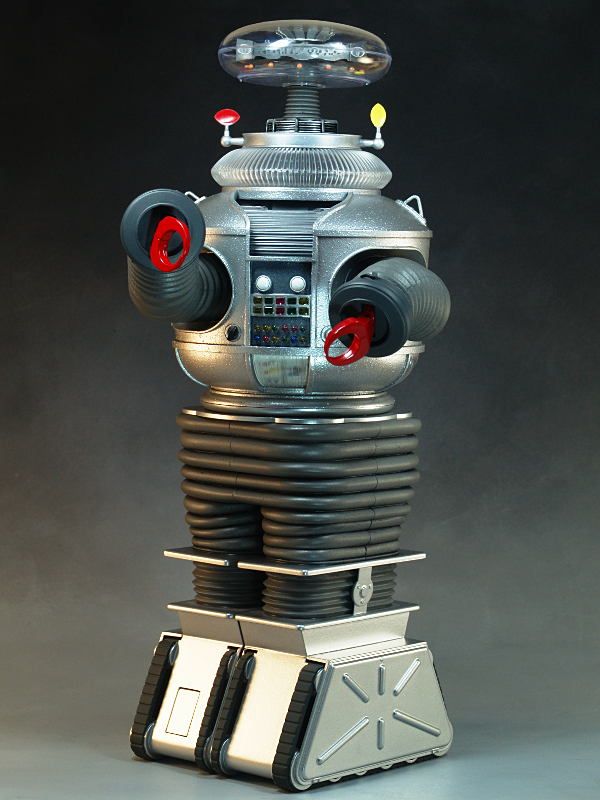
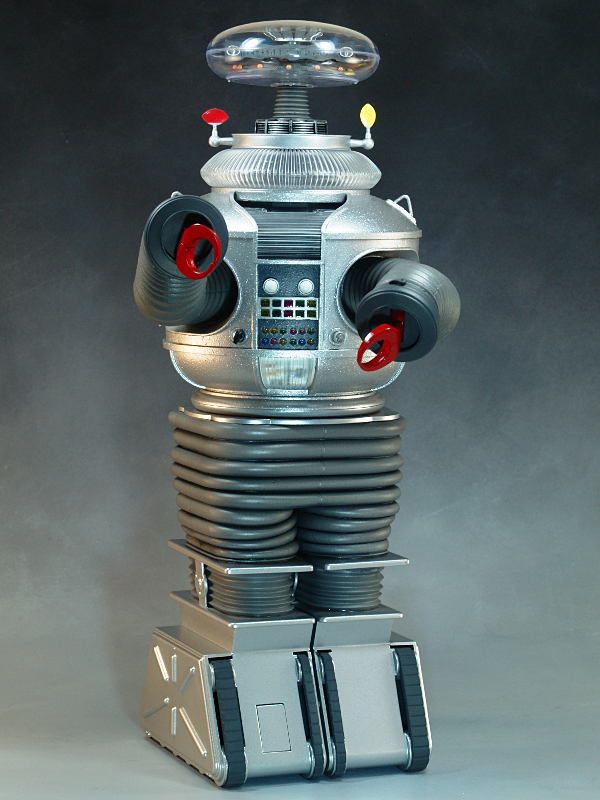
Things are coming together quickly now. This is a photo of the main body parts stacked together. These aren't permanently assembled yet but you can get an idea of what the finished product will look like.
 |
|
| Back to top |
|
|
Bud Brewster
Galactic Fleet Admiral (site admin)
Joined: 14 Dec 2013
Posts: 17637
Location: North Carolina
|
| Posted: Sat Nov 29, 2014 8:01 pm Post subject: |
|
|
Although your model is absolutely gorgeous, I've never been too fond of the design of the robot. He seems way too tall for those small treads, his arms have a limited reach, and his hands are just big pinchers -- good for very little, it seems to me.
The movie version of Lost in Space has a pretty impressive robot -- and towards the end we even see a variation on the TV version that addresses some of the problems I mentioned.
I can't find a good picture of it, but this drawing shows what I mean. This guy could run an off-road race!

_________________
____________
Is there no man on Earth who has the wisdom and innocence of a child?
~ The Space Children (1958) |
|
| Back to top |
|
|
Robert (Butch) Day
Galactic Ambassador

Joined: 19 Sep 2014
Posts: 1377
Location: Arlington, WA USA
|
| Posted: Sat Nov 29, 2014 8:37 pm Post subject: |
|
|
Does this help, Bud?

The commercial models of our Robot(s):

_________________
Common Sense ISN'T Common |
|
| Back to top |
|
|
Brent Gair
Mission Specialist
Joined: 21 Nov 2014
Posts: 466
|
| Posted: Sat Nov 29, 2014 9:05 pm Post subject: |
|
|
I've actually got a model and several toy versions of the movie robot. Back when the movie came out, I mistakenly got it in my mind that the movie toys might have some collector value  . But that robot never grew on me and I never bothered to build the kit. . But that robot never grew on me and I never bothered to build the kit.
The movie robot is too industrial for my taste. It looks like one of those bomb disposal robots:). I prefer my 'bots to be humanoid...not very practical but possessing some endearing, identifiably human traits.
It's like my taste in space ships. The stuff from the 1950's is, for the most part, completely impractical and sometimes downright ridiculous. However, there is something just boringly sterile about modern movie space ships. |
|
| Back to top |
|
|
Brent Gair
Mission Specialist
Joined: 21 Nov 2014
Posts: 466
|
| Posted: Sun Nov 30, 2014 4:28 pm Post subject: |
|
|
Done.
 |
|
| Back to top |
|
|
Bud Brewster
Galactic Fleet Admiral (site admin)
Joined: 14 Dec 2013
Posts: 17637
Location: North Carolina
|
| Posted: Sun Nov 30, 2014 6:50 pm Post subject: |
|
|
Emerald Duck Call Award
I started a new section in your gallery.
http://www.allsci-fi.us/phpbb/viewtopic.php?t=812
_________________
____________
Is there no man on Earth who has the wisdom and innocence of a child?
~ The Space Children (1958) |
|
| Back to top |
|
|
Rocky Jones
Astral Engineer

Joined: 17 Dec 2014
Posts: 224
Location: North Texas
|
| Posted: Fri Oct 30, 2015 9:56 pm Post subject: |
|
|
| That is a beautifully built kit, Brent. I hadn't realized that one was a vinyl kit. There must be some good ways to reinforce those things to keep paint from flecking and such. Maybe you'll keep this one in a glass case. It's certainly worth preserving. |
|
| Back to top |
|
|
Brent Gair
Mission Specialist
Joined: 21 Nov 2014
Posts: 466
|
| Posted: Fri Oct 30, 2015 10:22 pm Post subject: |
|
|
| Rocky Jones wrote: | | That is a beautifully built kit, Brent. I hadn't realized that one was a vinyl kit. ... |
Only the flexible parts shown in one of the photos are vinyl. The rest of the kit is standard styrene. Masudaya makes a 1/5 kit that is all vinyl.
The vinyl on this kit is problematic because it is VERY thin so you need to do a lot of advance planning and fitting. It's important to get all of the fit issues worked out ahead of time so that the vinyl parts will slip into place very easily. If you have to grab them and force them into position, the paint will flake for sure. The thinness of the vinyl is the one drawback of this kit because it's so fragile and intolerant of handling. On the Masudaya kit, the vinyl is thick-walled and handling is no problem. Unfortunately, the Masudaya kit is not as accurate as the Moebius kit.
I've actually made some minor changes to the paint work since posting the above photos. I'm thinking about entering the kit in a model contest held locally every year in the Spring. I'm doing a bit of work to bring the kit up to "contest quality". |
|
| Back to top |
|
|
|


